In today’s digital landscape, securing your web traffic is not just a best practice but a necessity. As more businesses and services move online, ensuring that data is transmitted securely becomes paramount. This is where SSL/TLS certificates come into play, providing a layer of encryption that protects sensitive information from prying eyes.
However, managing SSL/TLS certificates, especially in dynamic and scalable environments like Kubernetes, can be challenging. Enter Cert-Manager, a powerful Kubernetes add-on that automates the management and issuance of these certificates. By integrating Cert-Manager with Let’s Encrypt, you can automate the entire process of obtaining, renewing, and managing SSL/TLS certificates, ensuring that your web services remain secure with minimal effort.
In this blog, we will explore how to set up a secure Istio Gateway using Let’s Encrypt and Cert-Manager. We will guide you through the process of installing and configuring Cert-Manager in a Kubernetes cluster, obtaining certificates from Let’s Encrypt, and setting up a secure Istio Ingress Gateway to protect your web application.
Prerequisites: Kubernetes cluster with Istio
Before diving into the setup, ensure you have a Kubernetes cluster with Istio installed, including the Istio Ingress Gateway configured with a load balancer IP. This setup will be the foundation upon which we build our secure Gateway using Let’s Encrypt and Cert-Manager. Having Istio in place will streamline the process of managing traffic and applying security policies across your services.
# Istiod services
hl@istio-master01:~$ kubectl get svc -n istio-system
NAME                   TYPE           CLUSTER-IP       EXTERNAL-IP       PORT(S)                                                                      AGE
istio-ingressgateway   LoadBalancer   10.104.224.57    192.168.244.220   15021:30189/TCP,80:31672/TCP,443:31402/TCP,31400:31758/TCP,15443:31900/TCP   32d
istiod                 ClusterIP      10.108.197.62    <none>            15010/TCP,15012/TCP,443/TCP,15014/TCP                                        32d

# Istiod deployments
hl@istio-master01:~$ kubectl get deploy -n istio-system
NAME                   READY   UP-TO-DATE   AVAILABLE   AGE
istio-ingressgateway   1/1     1            1           32d
istiod                 1/1     1            1           32d

# Istiod pods
hl@istio-master01:~$ kubectl get pods -n istio-system
NAME                                    READY   STATUS    RESTARTS      AGE
istio-ingressgateway-6b7c788c74-9krm9   1/1     Running   1 (30d ago)   32d
istiod-64d8d5769b-v8nhv                 1/1     Running   1 (30d ago)   32d
Deploying Cert-Manager using the Jetstack Helm chart
Cert-manager is crucial for automating X.509 certificates in Kubernetes, ensuring secure communication within and beyond your cluster. By simplifying issuance, renewal, and management, it reduces manual effort and enhances security. Now, let's dive into the practical side by installing Cert-Manager and harnessing these benefits firsthand.
To install Cert-Manager via Helm, you can use the official Helm chart repository provided by Jetstack. This repository hosts the latest stable releases of Cert-Manager, ensuring you have access to the most up-to-date features and security patches.
# Add the charts.jetstack.io Helm repository
hl@istio-master01:~$ helm repo add jetstack https:
# Update all Helm repositories
hl@istio-master01:~$ helm repo update
Before deploying the Helm chart for Cert-Manager, let’s ensure we’ve created a dedicated namespace and gathered all necessary values.
# Create Cert-Manager namespace
hl@istio-master01:~$ kubectl create namespace cert-manager
# Values.yaml
---
installCRDs: true
replicaCount: 3
# Required for the dns01 challange which
# validates that you control the domain names.
# Depending on your DNS provider, I recommend using their public DNS resolver.
extraArgs:
  - --dns01-recursive-nameservers=1.1.1.1:53
  - --dns01-recursive-nameservers-only
# This parameter indicates that we are not utilizing the
# DNS of the host machine.
podDnsPolicy: None
podDnsConfig:
  nameservers:
    - 1.1.1.1
Let’s move forward with the deployment of the Cert-Manager Helm chart.
# Install Cert-Manager using the Helm Chart
hl@istio-master01:~$ helm install cert-manager jetstack/cert-manager --namespace cert-manager --values=values.yaml --version v1.15.1
Verify if Cert-Manager has been deployed successfully in your Kubernetes cluster.
# Get the Cert-Manager pods
hl@istio-master01:~$ kubectl get pods -n cert-manager
NAME                                      READY   STATUS    RESTARTS      AGE
cert-manager-74bc87499f-pwlj9             1/1     Running   1(30d ago)   31d
cert-manager-cainjector-9b74bc658-z7tmd   1/1     Running   1(30d ago)   31d
cert-manager-webhook-7ddfd7c4bd-z4rgx     1/1     Running   1(30d ago)   31d
Let’s Encrypt ClusterIssuer with Cert-Manager
Since we’re using Cloudflare as our DNS provider, it’s crucial to securely integrate its API functionality for Cert-Manager and Let’s Encrypt. This involves extracting the Cloudflare API token and storing it as a Kubernetes secret.
Ensure that the API token in Cloudflare has Zone:Read, DNS:Edit permissions.
---
apiVersion: v1
kind: Secret
metadata:
  name: cloudflare-token-secret
  namespace: cert-manager
type: Opaque
data:
  cloudflare-token: <enter you Cloudflare API token here>
# Apply the cloudflare-token-secret
hl@istio-master01:~$ kubectl apply -f cloudflare-token-secret.yaml
Let’s Encrypt provides both staging and production API endpoints. The staging endpoint is intended for testing purposes, enabling developers to experiment and validate configurations without impacting production environments. In contrast, the production endpoint is designed for live deployments and operational use. It incorporates rate-limiting measures to ensure stable performance and reliability under production workloads.
So, we’ll start by configuring a ClusterIssuer using the Let’s Encrypt staging endpoint. Once we confirm everything is functioning correctly, we’ll transition to configuring the production ClusterIssuer towards the end of the blog.
---
apiVersion: cert-manager.io/v1
kind: ClusterIssuer
metadata:
name: letsencrypt-staging
spec:
acme:
# The acme-staging endpoint
server: https:
# Cloudflare email
email: example@conro.be
privateKeySecretRef:
name: letsencrypt-staging
# Challenge type
solvers:
- dns01:
cloudflare:
# Cloudflare email
email: example@conro.be
# Kubernetes secret containing the Cloudflare API token
apiTokenSecretRef:
name: cloudflare-token-secret
key: cloudflare-token
# Selector to use specific DNS zone
selector:
dnsZones:
- "jverhavert.com"
# Apply the letsencrypt-staging ClusterIssuer
hl@istio-master01:~$ kubectl apply -f issuer-staging.yaml
Expose Bookinfo Application with Istio Gateways
To expose the Bookinfo application using Istio Gateways, I highly recommend checking out our previous blog post. It provides a comprehensive, step-by-step guide on this topic, ensuring you have all the necessary information to successfully configure and manage Istio Gateways for the Bookinfo application.
After successfully installing and testing the Bookinfo application, it’s time to configure the certificates. Below is an example of how the certificate should look with the staging ClusterIssuer.
---
apiVersion: cert-manager.io/v1
kind: Certificate
metadata:
  name: bookinfo-jverhave-com
  namespace: istio-system
spec:
  secretName: bookinfo-com-tls
  issuerRef:
    name: letsencrypt-staging
    kind: ClusterIssuer
  commonName: "bookinfo.jverhavert.com"
  dnsNames:
  -  "bookinfo.jverhavert.com"
# Apply the bookinfo-jverhave-com certificate
hl@istio-master01:~$ kubectl apply -f bookinfo-jverhave-com.yaml
I prefer to store my certificates within the istio-system namespace to keep them as close as possible to the Istio ingress gateway, but the choice is yours.
After applying the certificate, you can check its status to see if it is still pending by:
# Get challenges of the staging bookinfo-jverhave-com certificate
hl@istio-master01:~$ kubectl get challenges -n istio-system
NAME                                          STATE     DOMAIN                    AGE
bookinfo-jverhave-com-1-408262643-887231319   pending   bookinfo.jverhavert.com   82s
When the certificate is ready, you will see this reflected in the status of the certificate resource. Recheck the challenges; if no challenges are visible anymore, you know the challenge has been accepted and the certificate is ready.
# Get staging bookinfo-jverhave-com challenges
hl@istio-master01:~$ kubectl get challenges -n istio-system
No resources found in istio-system namespace.

# Get staging bookinfo-jverhave-com certificate
hl@istio-master01:~$ kubectl get certificate -n istio-system
NAME                    READY   SECRET             AGE
bookinfo-jverhave-com   True    bookinfo-com-tls   4m11s
With the certificate ready and the challenge accepted, we can proceed to configure the gateway with the TLS settings.
# Remove current bookinfo-gateway resource
  hl@istio-master01:~$ kubectl delete gateway bookinfo-gateway
---
apiVersion: networking.istio.io/v1
kind: Gateway
metadata:
  name: bookinfo-gateway
  namespace: default
spec:
  selector:
    istio: ingressgateway
  servers:
  - hosts:
    - 'bookinfo.jverhavert.com'
    port:
      name: http
      number: 8080
      protocol: HTTP
    tls:
      httpsRedirect: true
  - hosts:
    - 'bookinfo.jverhavert.com'
    port:
      name: https
      number: 443
      protocol: HTTPS
    tls:
      credentialName: bookinfo-com-tls # This references the created secret by applying the certificate.
      mode: SIMPLE
# Apply the bookinfo-gateway gateway resource
hl@istio-master01:~$ kubectl apply -f bookinfo-gateway.yaml
gateway.networking.istio.io/bookinfo-gateway created
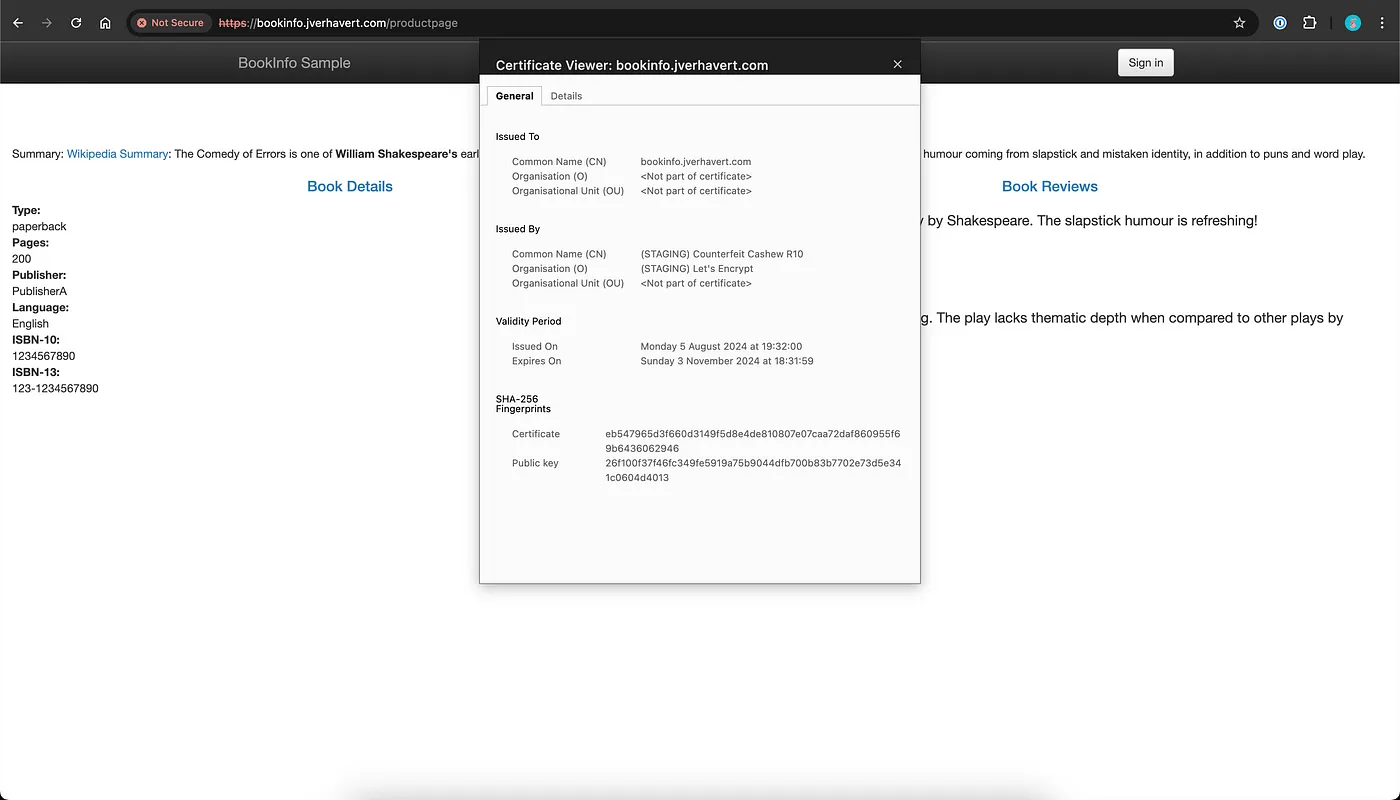
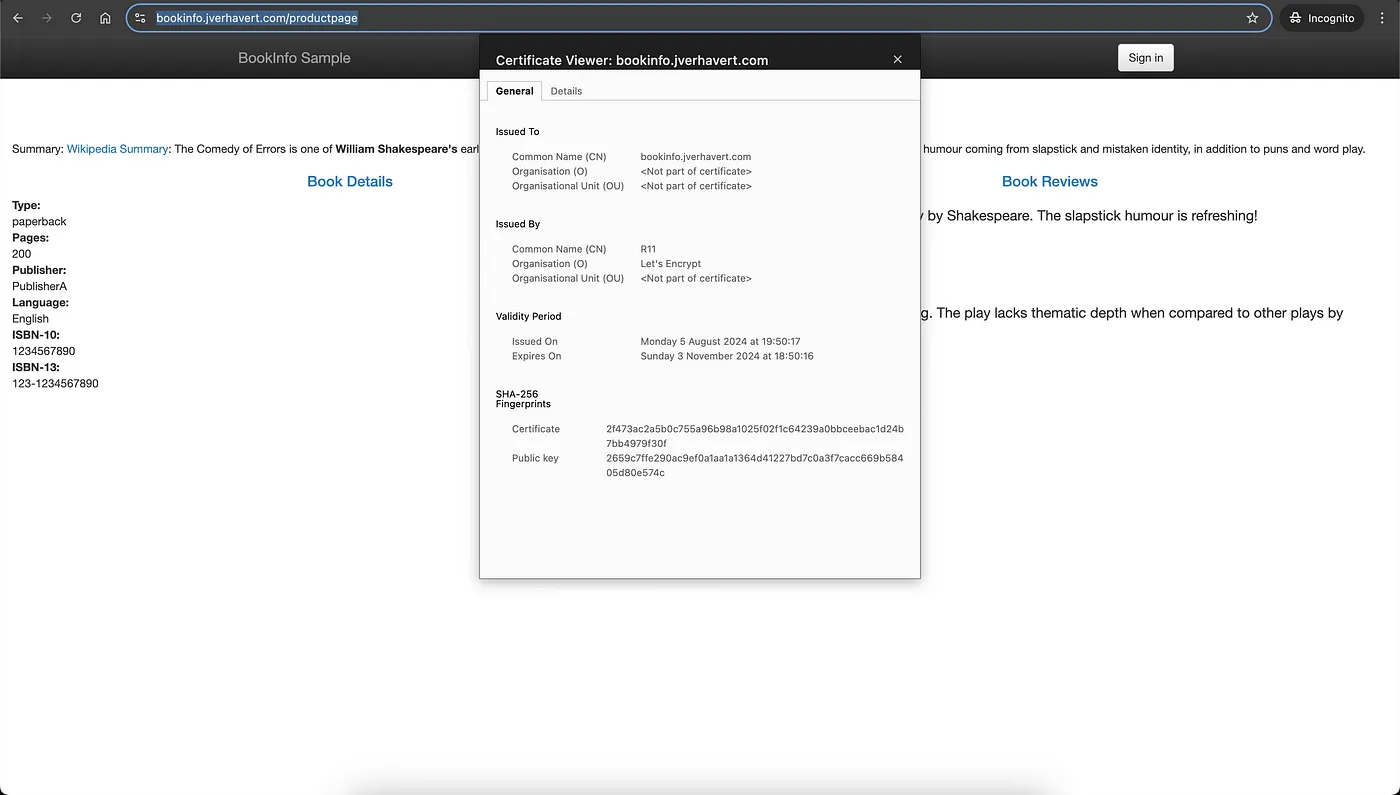
After recreating the gateway, you can verify the certificate in your browser by checking the issuer.

Once verified, we can transition to using a production ClusterIssuer from Let’s Encrypt. Be sure to clean up the staging certificate and its secret.
# Get certificates
hl@istio-master01:~$ kubectl get certificate -n istio-system
NAME                    READY   SECRET             AGE
bookinfo-jverhave-com   True    bookinfo-com-tls   13m

# Delete bookinfo-jverhave-com certificate
hl@istio-master01:~$ kubectl delete certificate bookinfo-jverhave-com -n istio-system
certificate.cert-manager.io "bookinfo-jverhave-com" deleted

# Get TLS secret's
hl@istio-master01:~$ kubectl get secret -n istio-system
NAME               TYPE                DATA   AGE
bookinfo-com-tls   kubernetes.io/tls   2      13m
istio-ca-secret    istio.io/ca-root    5      53d

# Delete bookinfo-com-tls TLS secret
hl@istio-master01:~$ kubectl delete secret bookinfo-com-tls -n istio-system
secret "bookinfo-com-tls" deleted
Create a new ClusterIssuer as follows:
---
apiVersion: cert-manager.io/v1
kind: ClusterIssuer
metadata:
name: letsencrypt-production
spec:
acme:
# The acme-staging endpoint
server: https:
# Cloudflare email
email: example@conro.be
privateKeySecretRef:
name: letsencrypt-production
# Challenge type
solvers:
- dns01:
cloudflare:
# Cloudflare email
email: example@conro.be
# Kubernetes secret containing the Cloudflare API token
apiTokenSecretRef:
name: cloudflare-token-secret
key: cloudflare-token
# Selector to use specific DNS zone
selector:
dnsZones:
- "jverhavert.com"
# Apply the letsencrypt-production ClusterIssuer
hl@istio-master01:~$ kubectl apply -f letsencrypt-production.yaml
Next, check if the ClusterIssuer is ready by running the command below.
# Get the Let's Encrypt ClusterIssuer
hl@istio-master01:~$ kubectl get clusterissuer -A
NAME                     READY   AGE
letsencrypt-production   True    49d
letsencrypt-staging      True    50d
After confirming that the ClusterIssuer is ready, delete the staging certificate and its TLS secrets to ensure that the Istio Gateway uses the production certificate and TLS secret.
# Get bookinfo certificates
hl@istio-master01:~$ kubectl get certificate -n istio-system
NAME                    READY   SECRET             AGE
bookinfo-jverhave-com   True    bookinfo-com-tls   50m

# Delete the bookinfo certificates
hl@istio-master01:~$ kubectl delete certificate bookinfo-jverhave-com -n istio-system
certificate.cert-manager.io "bookinfo-jverhave-com" deleted

# Delete the bookinfo TLS secrets
hl@istio-master01:~$ kubectl delete secret bookinfo-com-tls -n istio-system
secret "bookinfo-com-tls" deleted
Next, you can proceed to create the production certificate. To do so, follow these steps:
---
apiVersion: cert-manager.io/v1
kind: Certificate
metadata:
  name: bookinfo-jverhave-com
  namespace: istio-system
spec:
  secretName: bookinfo-com-tls
  issuerRef:
    name: letsencrypt-production
    kind: ClusterIssuer
  commonName: "bookinfo.jverhavert.com"
  dnsNames:
  -  "bookinfo.jverhavert.com"
# Apply the production bookinfo-jverhave-com certificate
hl@istio-master01:~$ kubectl apply -f bookinfo-jverhave-com.yaml
certificate.cert-manager.io/bookinfo-jverhave-com created
After applying the certificate, you can check its status to see if it is still pending by:
# Get bookinfo challenges
hl@istio-master01:~$ kubectl get challenges -n istio-system
NAME                                           STATE     DOMAIN                    AGE
bookinfo-jverhave-com-1-702708937-1613557471   pending   bookinfo.jverhavert.com   13s
For more information on the certificate propagation, you can always check the logs of the Cert-Manager pod.
# Get bookinfo certificates
hl@istio-master01:~$ k get certificates -n istio-system
NAME                    READY   SECRET             AGE
bookinfo-jverhave-com   True    bookinfo-com-tls   2m22s
Since we’ve already updated the gateway with the TLS settings, there’s no need to reset it again. Removing the old TLS secret and its certificate and re-applying the new one is sufficient. Validate if https://bookinfo.jverhavert.com/productpage has a valid Let’s Encrypt certificate.

Success! That’s how you configure Istio Ingress Gateways with TLS encryption using Let’s Encrypt and Cloudflare.


