Sep 13, 2024
As telecommunications companies increasingly adopt cloud-native technologies, Kubernetes has emerged as a key platform for deploying modern applications and network functions. However, the default Kubernetes networking model, which limits each pod to a single network interface, often falls short of meeting the complex requirements of telecom environments. Multus CNI steps in to bridge this gap, enabling multiple network interfaces within a single pod and providing the flexibility needed for advanced telecom use cases.
In this blog, we’ll explore how Multus CNI enhances Kubernetes, making it the ideal solution for driving innovation in 5G, NFV, and beyond.
What is Multus?
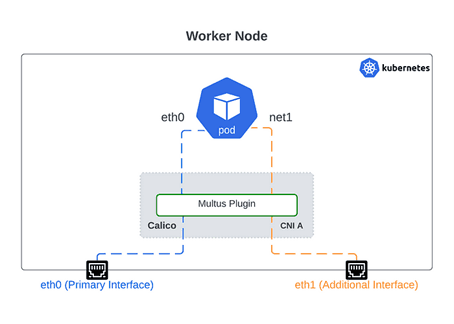
Kubernetes, by default, assigns only one network interface (like “eth0”) to each pod, which is usually enough for basic applications. However, some advanced use cases, especially in fields like telecommunications, need more complex networking setups. That’s where Multus comes in.Multus acts as a “meta-plugin” or manager that allows other network plugins to be used simultaneously. Instead of sticking with just one network connection, Multus can call other plugins like Calico, Flannel, or Macvlan, and attach multiple networks to a single pod. This setup is particularly useful when you need to separate traffic types, like separating data traffic from management traffic, or connecting to specialized high-speed networks.
But How Does Multus Work?
To install Multus, you typically deploy it as a DaemonSet within your Kubernetes cluster using a ready-made YAML manifest provided by the Multus project. This DaemonSet ensures that Multus is installed on every node in the cluster, enabling multi-network capabilities for your pods.
To install Multus, use the following command:
Before we dive into the steps on how to install Multus and configure NetworkAttachmentDefinitions, it’s important to understand the different types of network plugins that Multus can work with. Each type provides unique networking capabilities, allowing you to tailor Kubernetes to fit specific needs, especially in advanced telecom use cases.
Let’s quickly explore the key types of Multus plugins:
Macvlan: Creates multiple virtual network interfaces on a single physical interface, each with its own MAC address, providing high performance and traffic isolation at the link layer (Layer 2).
Ipvlan: Similar to Macvlan, but all virtual interfaces share the same MAC address, isolating traffic at the network layer (Layer 3), which simplifies and reduces overhead, especially in environments with MAC address limitations.
Bridge: Acts as a virtual switch, connecting pod interfaces to the host network, allowing pods to communicate on the same Layer 2 domain; it’s straightforward for basic connectivity but less scalable for performance-critical scenarios.
SR-IOV: Enables direct access to the network hardware by creating virtual functions on a NIC, bypassing the host’s networking stack, which provides near-native performance ideal for high-performance and low-latency applications like NFV.
Let’s now continue by creating a NetworkAttachmentDefinition, which specifies the additional network configurations that can be attached to a pod. This definition allows you to set up the desired network properties that Multus will use, making it easy to connect your pods to multiple networks. Use the following YAML code to do so:
To apply this YAML configuration, save it to a file (e.g., macvlan-blog.yaml) and use the kubectl apply command:
We’ve just applied the Multus NetworkAttachmentDefinition to our cluster. Next, we’ll be creating a pod and applying the necessary annotations to attach a second interface to it. Use the following YAML code to do so:
We’ve successfully deployed the Busybox pod with the Multus annotations. Our next step is to verify that the pod has been assigned the second network interface and ensure that it is reachable. We’ll check the pod’s network configuration and connectivity to confirm that everything is set up correctly.
Everything is working as expected! The Busybox pod has the second network interface and is reachable.
While this example was straightforward, real-world scenarios can be more complex. You might encounter situations where using IP ranges in the NetworkAttachmentDefinition is necessary, or you may need to work with different network types and configurations. Always consider the specific requirements of your deployment to ensure optimal setup and performance.
Conclusion
Multus offers a robust solution for complex networking scenarios within Kubernetes, enabling the use of multiple network interfaces in a single pod. This capability is crucial for advanced, production-grade use cases where diverse networking requirements must be met. By expanding Kubernetes networking capabilities, Multus provides greater flexibility and scalability, making it an invaluable tool for modern cloud-native environments.
Call to Action
Ready to explore the benefits of Multus for your Kubernetes cluster? Dive into its powerful networking features and see how it can enhance your setup.For expert assistance with Kubernetes networking and cloud-native solutions, don’t hesitate to reach out us (conro.io). Our team is here to help you navigate and implement these advanced technologies seamlessly.
